Create account:
Create a free account on pythonanywhere.com. Login to your account.
Login
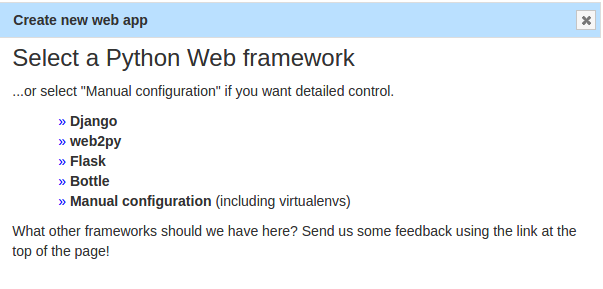
In the dashboard, click on the web tab. Now add a new web app.
Free account does not support custom domain names. So your app will go live on your-username.pythonanywhere.com. You need to upgrade to a paid account for custom domain names.
Create Web App
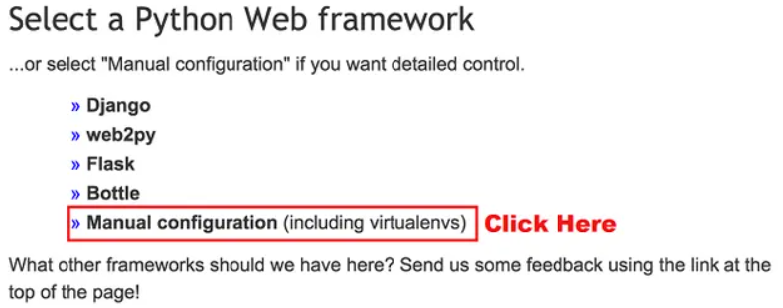
Important: choose Manual configuration
Click on Add a new web app
Upload files
- Zip the project files
- Go to files
- Project location
- upload the zipped project
- Click on Open Bash console here
- unzip myproject.zip
- update setting.py
- Debug = False
- Allowed host
- Static link
Alternatively
git clone https://github.com/studygyaan/Django-CRM-Project.git
Create VirtualEnv and Install Django and Dependencies
In your Bash console, create a virtualenv, named after your project name, and choose the version of Python you want to use like we are using now 3.7:
mkvirtualenv --python=/usr/bin/python3.7 mysite-virtualenv
You will see now in terminal like this – (mysite-virtualenv) $ which means virtualenv is activated. If you don’t then type bellow command which will activate it.
workon mysite-virtualenv
Once the Virtual Env is activated. We will install Django inside it. There are two ways to do it. If you have requirements.txt file then you can use following
pip install -r requirements.txt
Also install all other dependencies your system needs
Setting up your Django Web app and WSGI file
At this point, you need to be armed with 3 pieces of information:
1. The path to your Django project’s top folder — the folder that contains “manage.py”, eg – /home/myusername/mysite
2. The name of your project (that’s the name of the folder that contains your settings.py), eg mysite
3. The name of your virtualenv, eg mysite-virtualenv
Create a Web Application with Manual Config
Go to Web Tab and Click on it. You will see create a web application button, click on it and follow instructions.
NOTE: Make sure you choose Manual Configuration, not the “Django” option, that’s for new projects only.
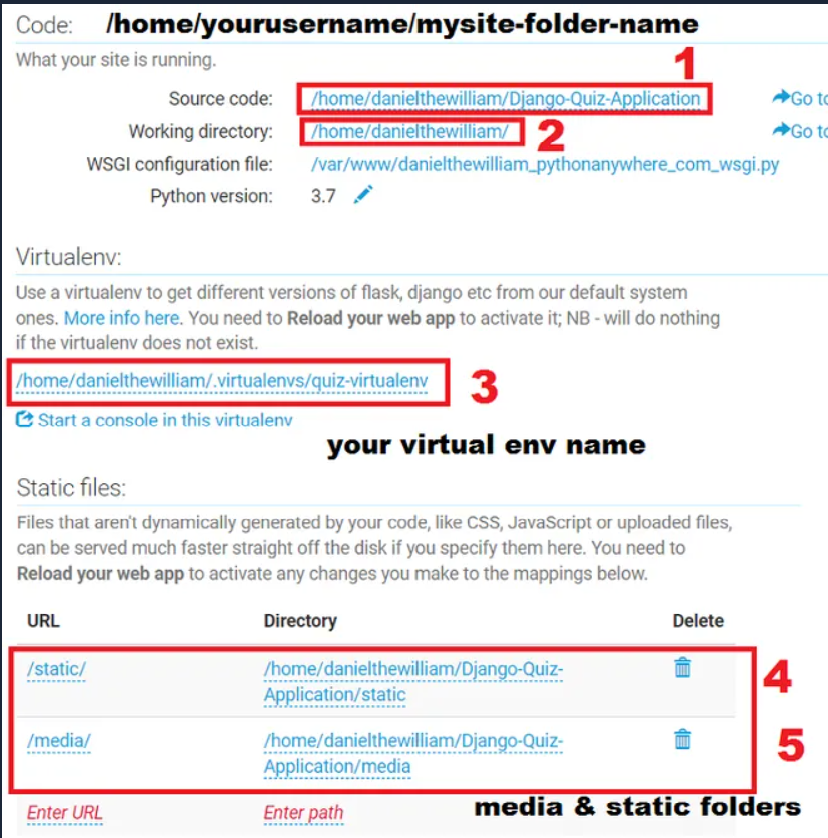
Once your web app is created, scroll down and you need to add some paths like shown in bellow image.
Note – Maker sure you add folders’ names accordingly to your project names.
1.Code –
/home/myusername/mysite/
2.Virtualenv –
/home/username/.virtualenvs./mysite-virtualenv
Example
Assuming my setting.py files is at /home/eito/myproject/app/config/setting.py
The settings will be:
WSGI configuration file: /var/www/eito_pythonanywhere_com_wsgi.py
Python version: 3.8
Static files:
Files that aren't dynamically generated by your code, like CSS, JavaScript or uploaded files, can be served much faster straight off the disk if you specify them here. You need to Reload your web app to activate any changes you make to the mappings below.
| URL | Directory |
|---|---|
| /static/ | /home/eito/myproject/app/static |
| /media/ | /home/eito/myproject/app/media |
Edit WSGI File to Point our Django Project to Server
Click on the WSGI configuration file link. It will take you to your Hosted Django Project WSGI File. We need to add the following code.
Just remove everything inside that file and paste the bellow code in it. Note you need to change bold code which your relevant paths
import sys
import os

# assuming your Django settings file is at
# '/home/eito/myproject/app/config/settings.py'
path = '/home/eito/myproject/app'
if path not in sys.path:
     sys.path.insert(0, path)

os.environ['DJANGO_SETTINGS_MODULE'] = 'config.settings'

from django.core.wsgi import get_wsgi_application
application = get_wsgi_application()
Save the file.
That’s it. Now the file step is to go to Web Tab and reload the web app and click on the link of your web app.
Disallowed Host Error
If you get Disallowed Host at Django let just add ‘*’ in ALLOWED_HOSTS in settings.py file and Reload the Web App.
ALLOWED_HOSTS =['*']
Django: no such table: django_session
It could be that the server uses a different working directory than the manage.py command. Since you provide a relative path to the sqlite database, it is created in the working directory. Try it with an absolute path, e.g.:
'NAME': '/home/eito/myproject/app/db.sqlite3',
Remember that you have to either run ./manage.py syncdb again or copy your current database with the existing tables to /tmp.
If it resolves the error message, you can look for a better place than /tmp 🙂


